This guide will attempt to show you how you can run more than one Masternode (MN) on a single VPS a technique I call multiplexing. To save space due to data redundancy the masternodes will share a common blockchain. The guide assumes you have setup your masternode as per guide https://www.dash.org/forum/threads/...e-setup-with-systemd-auto-re-start-rfc.39460/ and uses the VULTR hosting provider, because they offer additonal IPs for your hosting.
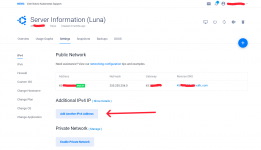
Starting with your existing running masternode created from my guide, goto your admin panel on VULTR and add another IPv4 IP.

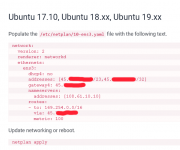
Next as the dashadmin user click on 'networking configuration' on vultr and copy and paste the text for the latest Ubuntu build as described on thatpage for your OS.

After updating /etc/netplan/10-ens3.yaml with your new IP apply the changes.
To enable the new IP now restart the VPS from the Vultr admin panel, sudo reboot won't do it.
ssh back into the machine and test the new network by trying to ssh on it, eg.
You should see a prompt asking you to confirm the security fingerprint of the server (yes/no). If you see that, then your IP is working correctly, otherwise you need to troubleshoot your VPS before continuing with this guide....
Next we create some new users, one for the second DASH MN and the other for the common files (blocks) that both MNs will share.
As dashadmin,
Now we set a hard password for the new users, you do not have to write these down, you will never need them.
Next, we create directories and set permissions.
Next, shutdown the running dashd and move the common files to the shared user, create a few links back to these files and restart the node...
Run the below as the dashadmin user
Sudo to the dash user and run the rest.
Now, while the dashd is still down, we need to change the dash.conf file slightly.
Ensure the externalip is set like normal, but also set a new parameter called
bind= to the same IP, this is your orginal node. Then add a new parameter like below
rpcport=9998
As the dashadmin user, update the file permisssions once more.
Restart the dashd as the dashadmin user....
Verify that the dashd has restarted successfully before moving on, otherwise troubleshoot your changes.
Initialise, the second masternode, this will be a clone of the other masternode, but we will update the details in the dash.conf shortly.
Stop the dashd daemon once more and copy the files over.
Remove some stale cache files that would conflict with the original node, these will be rebuilt. note the below rm command will remove wallets, you should not have any dash stored on a MN anyway, but make sure that is the case before proceeding.
Now that the data has been copied over, you can again restart the orginal node as the dashadmin user....
Since, the dash02 is a clone of the first node, we need to enter the specifics for this node, edit the dash.conf file like so.
and the things you need to change are listed below.
Change the RPC port to 9997, although you can choose another number larger than 1024 that the system is not currently using... Make sure the bind and externalip are both set to your new (second) IP and that rpcuser/password are set to something different than the original node, also place the bls key for the new masternode too.
Now we setup up a systemd unit file for this second node so it starts and shuts down automatically.
The below should be run as the dashadmin user.
I have removed the comments from the above file to condense it, but it is very similar to the one used to start/stop the other dashd.
Next, we register the file with systemd and start the daemon.
Starting with your existing running masternode created from my guide, goto your admin panel on VULTR and add another IPv4 IP.

Next as the dashadmin user click on 'networking configuration' on vultr and copy and paste the text for the latest Ubuntu build as described on thatpage for your OS.

After updating /etc/netplan/10-ens3.yaml with your new IP apply the changes.
Code:
sudo netplan applyTo enable the new IP now restart the VPS from the Vultr admin panel, sudo reboot won't do it.
ssh back into the machine and test the new network by trying to ssh on it, eg.
Code:
ssh dashadmin@<new IP>You should see a prompt asking you to confirm the security fingerprint of the server (yes/no). If you see that, then your IP is working correctly, otherwise you need to troubleshoot your VPS before continuing with this guide....
Next we create some new users, one for the second DASH MN and the other for the common files (blocks) that both MNs will share.
As dashadmin,
Code:
sudo useradd -m -c dash02 dash02 -s /bin/bash
sudo useradd -m -c dash-common dash-common -s /usr/sbin/nologin
sudo usermod dashadmin -a -G dash02,dash-common
sudo usermod dash -a -G dash-common
sudo usermod dash02 -a -G dash-common
Now we set a hard password for the new users, you do not have to write these down, you will never need them.
Code:
< /dev/urandom tr -dc A-Za-z0-9 | head -c${1:-32};echo
sudo passwd dash02
< /dev/urandom tr -dc A-Za-z0-9 | head -c${1:-32};echo
sudo passwd dash-common
Next, we create directories and set permissions.
Code:
sudo mkdir -p /home/dash-common/.dashcore/blocks
sudo chown -v -R dash-common.dash-common /home/dash-common/
sudo chmod -v -R g+wxr /home/dash-common/
Next, shutdown the running dashd and move the common files to the shared user, create a few links back to these files and restart the node...
Run the below as the dashadmin user
Code:
sudo systemctl stop dashdSudo to the dash user and run the rest.
Code:
sudo su - dash
Code:
# Creates a variable of the list of files (blocks) we need to copy over, excluding the current block, which is still being written into.
files=$(ls /home/dash/.dashcore/blocks/blk*dat|head -$(($(ls /home/dash/.dashcore/blocks/blk*dat|wc -l)-1)))

# Append the list of rev files.
files+=$(echo;ls /home/dash/.dashcore/blocks/rev*dat|head -$(($(ls /home/dash/.dashcore/blocks/rev*dat|wc -l)-1)))

# Move the blocks over to the common location
for f in $files;do mv -v $f /home/dash-common/.dashcore/blocks/;done

# Now the dash user will create symlinks back to those files to replace the moved ones.

cd ~/.dashcore/blocks/
for f in /home/dash-common/.dashcore/blocks/*;do ln -vs $f $(basename $f);done
Now, while the dashd is still down, we need to change the dash.conf file slightly.
Ensure the externalip is set like normal, but also set a new parameter called
bind= to the same IP, this is your orginal node. Then add a new parameter like below
rpcport=9998
Code:
nano ~/.dashcore/dash.confAs the dashadmin user, update the file permisssions once more.
Code:
sudo chown -v -R dash-common.dash-common /home/dash-common/
sudo chmod -v -R g+wrx /home/dash-common/.dashcore/blocks/
Restart the dashd as the dashadmin user....
Code:
sudo systemctl start dashdVerify that the dashd has restarted successfully before moving on, otherwise troubleshoot your changes.
Initialise, the second masternode, this will be a clone of the other masternode, but we will update the details in the dash.conf shortly.
Stop the dashd daemon once more and copy the files over.
Remove some stale cache files that would conflict with the original node, these will be rebuilt. note the below rm command will remove wallets, you should not have any dash stored on a MN anyway, but make sure that is the case before proceeding.
Code:
sudo systemctl stop dashd
sudo cp -va /home/dash/.dashcore /home/dash02
sudo chown -v -R dash02.dash02 /home/dash02/
sudo rm -fr /home/dash02/.dashcore/{.lock,d*.log,*.dat} /home/dash02/.dashcore/backups/
Now that the data has been copied over, you can again restart the orginal node as the dashadmin user....
Code:
sudo systemctl start dashdSince, the dash02 is a clone of the first node, we need to enter the specifics for this node, edit the dash.conf file like so.
Code:
sudo nano /home/dash02/.dashcore/dash.confand the things you need to change are listed below.
rpcuser
rpcpassword
externalip
bind
masternodeblsprivkey
rpcport
Change the RPC port to 9997, although you can choose another number larger than 1024 that the system is not currently using... Make sure the bind and externalip are both set to your new (second) IP and that rpcuser/password are set to something different than the original node, also place the bls key for the new masternode too.
Now we setup up a systemd unit file for this second node so it starts and shuts down automatically.
The below should be run as the dashadmin user.
Code:
sudo mkdir -p /etc/systemd/system&&\
sudo bash -c "cat >/etc/systemd/system/dashd02.service<<\"EOF\"
[Unit]
Description=Dash Core Daemon (2)
After=syslog.target network-online.target


[Service]
Type=forking
User=dash02
Group=dash02

OOMScoreAdjust=-1000

ExecStart=/opt/dash/bin/dashd -pid=/home/dash02/.dashcore/dashd.pid
TimeoutStartSec=10m

ExecStop=/opt/dash/bin/dash-cli stop

TimeoutStopSec=120

Restart=on-failure
RestartSec=120

StartLimitInterval=300
StartLimitBurst=3

[Install]
WantedBy=multi-user.target

EOF"
I have removed the comments from the above file to condense it, but it is very similar to the one used to start/stop the other dashd.
Next, we register the file with systemd and start the daemon.
Code:
sudo systemctl daemon-reload &&\
sudo systemctl enable dashd02 &&\
sudo systemctl start dashd02 &&\
echo "Dash02 is now installed as a system service and initializing..."
Last edited:

