Evonode quick start guide

xkcd

Well-known member
Masternode Owner/Operator
This guide will get you up and running no time flat.


Register the Evonode

Things you will need.
  • 4000 Dash in a single UTXO.
  • VPS with about 4 cores, 8GB RAM and at least 100GB of SSD storage.
  • A ZeroSSL account and API key (click on the developer section on the site)
First register your Evonode on the network in the normal way, that is send exactly 4000 Dash to an address you control and note the transaction hash and index of the UTXO, an explorer like https://chainz.cryptoid.info/dash/ is useful for getting this info, otherwise in the core wallet enter masternode outputs to list them out. While in the console generate your bls key with bls generate and note it down, then get a tenderdash node key from https://mnowatch.org/evonodes/ alternatively, the DashMate setup can generate this for you, but then you need to create the masternode after creating the server, which is fine too. Next use the protx register_prepare_evo command in the console to register this masternode with the network. Be sure to use local addresses in the core wallet for the Owner key, Payout key and Voting key. Do not use the Collateral key (address) for the payout address. For the Platform node ID enter the public (shorter part) of the Tenderdash node key, for the HTTP port enter 443, for the Platform P2P enter 26656 and select an address that has some Dash in it for the fee source. Enter this, then sign the output, then issue protx register_submit to complete the process.


Setup the server

Currently, DashMate is the only way to setup an Evonode.
Login to your VPS as 'root' and issue....


Code:
curl -fsSL https://get.docker.com -o get-docker.sh && sh ./get-docker.sh
wget https://github.com/dashpay/platform/releases/download/v1.5.0/dashmate-v1.5.0-8aa624e3e-linux-x64.tar.gz
tar xvf dashmate-v1.5.0-8aa624e3e-linux-x64.tar.gz
dashmate/bin/dashmate setup

Note, the version above is current as of now, but it will change, to find the link to the latest version of DashMate, use this link https://github.com/dashpay/platform/releases then right click on the package for your OS and copy that link and replace it in the above. Once DashMate is running, select the below options.


Then select the following options.
> mainnet
> evolution masterndoe
> yes (to not meeting system reqs)
> yes (to masternode registered, you do this step before even starting this)
> no (to import existing data)
> BLS key (enter the secret/private BLS key you already generated when creating the MN)
> Ed25519 node key (poorly named, this is asking for the private key of the Tenderdash node key, enter it here)
> External IP address (enter the IP address of this VPS, same one you registered the masternode with)
> ZeroSSL (choose this)
> ZeroSSL api key (enter it from your ZeroSSL account, yes you need to register with them)

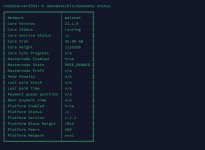
To start and verify the Evonode is running, use the below commands.

Code:
dashmate/bin/dashmate start
dashmate/bin/dashmate status
docker ps


Reinstall/Upgrade Evonode

The process to reinstall or upgrade the evonode is to,
  • Wipe the VPS and reinstall Ubuntu.
  • Download the new DashMate and try to upgrade via it.
The recommended approach is to wipe the VPS completely and start over, because the DashMate upgrade often messes up the functioning of the evonode and will result in your missed payments (fewer rewards) while you mess with it and get nowhere. Drawback of this approach, is it might burn one of your 3 free SSL certs from ZeroSSL, to overcome this, upgrade to a paid account with them.
 
Last edited:
To all Quick Starters! The DCG approach to upgrading is below!

Code:
rm -fr ~/dashmate
wget https://github.com/dashpay/platform/releases/download/v1.2.0/dashmate-v1.2.0-b4255f50f-linux-x64.tar.gz
tar xf dashmate-v1.2.0-b4255f50f-linux-x64.tar.gz
dashmate/bin/dashmate stop --platform
dashmate/bin/dashmate reset --platform
dashmate/bin/dashmate update
dashmate/bin/dashmate start --platform 
dashmate/bin/dashmate status
 
Extra notes to the above guide. When configuring the VPS, it is recommended to disable IPv6 as it can give some inconclusive results. Also, the OS may have ufw configured which would likely be blocking some ports, in that case, run the below to configure the firewall.

Code:
ufw limit ssh/tcp
ufw allow 443/tcp
ufw allow 9999/tcp
ufw allow 26656/tcp
ufw allow 80/tcp
ufw logging on
ufw enable
 
This guide will get you up and running no time flat.


Register the Evonode

Things you will need.
  • 4000 Dash in a single UTXO.
  • VPS with about 4 cores, 8GB RAM and at least 100GB of SSD storage.
  • A ZeroSSL account and API key (click on the developer section on the site)
First register your Evonode on the network in the normal way, that is send exactly 4000 Dash to an address you control and note the transaction hash and index of the UTXO, an explorer like https://chainz.cryptoid.info/dash/ is useful for getting this info, otherwise in the core wallet enter masternode outputs to list them out. While in the console generate your bls key with bls generate and note it down, then get a tenderdash node key from https://mnowatch.org/evonodes/ alternatively, the DashMate setup can generate this for you, but then you need to create the masternode after creating the server, which is fine too. Next use the protx register_prepare_evo command in the console to register this masternode with the network. Be sure to use local addresses in the core wallet for the Owner key, Payout key and Voting key. Do not use the Collateral key (address) for the payout address. For the Platform node ID enter the public (shorter part) of the Tenderdash node key, for the HTTP port enter 443, for the Platform P2P enter 26656 and select an address that has some Dash in it for the fee source. Enter this, then sign the output, then issue protx register_submit to complete the process.
I've been trying to run the evonode for three days now.

There are always some problems

Port 26656 is not available

Although it works by itself...

It seems like the problem appears somewhere in the Thunderdash docker container

Until the node is completely synchronized, the port should be open?


{
"id": "378597e669efe87301e78b7c5d4f279f6462492c",
"priv_key": {
"type": "tendermint/PrivKeyEd25519",
"value": "YRGKTKKUemDaoS3H3LwgQQXlr6Qb2Ipmvx9p51BR9XniWsxlNPFJD8io9erJTrl9BufCCMKIEC0hY5f1MB50bw=="
}
}
The above is your unique and secure Dash Platform Node-id and Node-key. From the first line, the 'id' portion of the above can be entered in the protx register_prepare_evo part of the Evonode setup in argument 9 labelled 'platformNodeID'. Copying the block above will give you the private key for your node_key.json file which goes in your tenderdash configuration. In case you are setting up an Evonode now and intend to later setup the server running tenderdash etc, just copy the entire block above and save it in a password manager or similar until you need it.

The table below lists details about every registered evonode on the network, the data is refreshed every 15 mins. Another helpful resource is the Platform Explorer Validators page.

Is this a mandatory item?

or is it enough dashmate setup?
 
Last edited:
Code:
curl -fsSL https://get.docker.com -o get-docker.sh && sh ./get-docker.sh
wget https://github.com/dashpay/platform/releases/download/v1.2.0/dashmate-v1.2.0-b4255f50f-linux-x64.tar.gz
tar xvf dashmate-v1.2.0-b4255f50f-linux-x64.tar.gz
dashmate/bin/dashmate setup
Now I have restarted the evonode according to your commands... I am waiting for synchronization... Port 26656 is closed for now but I hope it will open after full synchronization
 
Tenderdash nodeID optionally comes from mnowatch site OR from dashmate setup.
while the core was synchronizing, I got banned... Can the ban be removed automatically or do I need to re-register?
 

Attachments

  • 786.jpg
    786.jpg
    98.6 KB · Views: 76
was synchronizing, I got banned... Can the ban be removed automatically or do I need to re-reg
The ban will be removed after you issue protx update_service_evo .... We do this from the core wallet, some people do it from DMT.

platformNodeId - where can I get it?

it is a Ed25519 node key?

This is gotten from the evonodes page.
 
The ban will be removed after you issue protx update_service_evo .... We do this from the core wallet, some people do it from DMT.


This is gotten from the evonodes page.

node seems to work!!!!

but on the site https://mnowatch.org/evonodes/

the columns are not filled - Active (YNU), Protocol version, User agent
Скриншот 16-09-2024 07.18.34.png


is this normal? and will they appear later? after the first block?
or do I need to install something else or register somewhere?

Protocol versionUser agent
 
Last edited:
node seems to work!!!!

but on the site https://mnowatch.org/evonodes/

the columns are not filled - Active (YNU), Protocol version, User agent
View attachment 12623

is this normal? and will they appear later? after the first block?
or do I need to install something else or register somewhere?

Protocol versionUser agent


This is normal for a new node! Your platform data looks good to me, I do believe your node is now setup correctly, congratulations !!!
 
This is normal for a new node! Your platform data looks good to me, I do believe your node is now setup correctly, congratulations !!!
When will credits be added? Only after the first block or is it possible earlier?
to understand that everything is going well
 
Upgrading to Platform v1.3.0 for quick start quide users is as easy as this one liner.

Code:
rm -fr ~/dashmate ;wget https://github.com/dashpay/platform/releases/download/v1.3.0/dashmate-v1.3.0-69a350b9b-linux-x64.tar.gz &&tar xf dashmate-v1.3.0-69a350b9b-linux-x64.tar.gz &&dashmate/bin/dashmate stop --platform &&dashmate/bin/dashmate update &&dashmate/bin/dashmate start --platform  &&dashmate/bin/dashmate status
 
Upgrading to Platform v1.4.0 for quick start quide users is as easy as this one liner.

Code:
rm -fr ~/dashmate ;wget https://github.com/dashpay/platform/releases/download/v1.4.0/dashmate-v1.4.0-e406d63b8-linux-x64.tar.gz &&tar xf dashmate-v1.4.0-e406d63b8-linux-x64.tar.gz &&dashmate/bin/dashmate stop --platform &&dashmate/bin/dashmate update &&dashmate/bin/dashmate start --platform  &&dashmate/bin/dashmate status
 
Upgrading to Platform v1.4.1for quick start guide users is as easy as this one liner.

Code:
rm -fr ~/dashmate ;wget https://github.com/dashpay/platform/releases/download/v1.4.1/dashmate-v1.4.1-af542f7ab-linux-x64.tar.gz &&tar xf dashmate-v1.4.1-af542f7ab-linux-x64.tar.gz &&dashmate/bin/dashmate stop --platform &&dashmate/bin/dashmate update &&dashmate/bin/dashmate start --platform  &&dashmate/bin/dashmate status
 
Upgrading to Platform v1.5.0for quick start guide users is as easy as this one liner.

Code:
rm -fr ~/dashmate ;wget https://github.com/dashpay/platform/releases/download/v1.5.0/dashmate-v1.5.0-8aa624e3e-linux-x64.tar.gz &&tar xf dashmate-v1.5.0-8aa624e3e-linux-x64.tar.gz &&dashmate/bin/dashmate stop --platform &&dashmate/bin/dashmate update &&dashmate/bin/dashmate start --platform  &&dashmate/bin/dashmate status
 
Upgrading to Platform v1.5.1 for quick start guide users is as easy as this one liner.

Code:
rm -fr ~/dashmate ;wget https://github.com/dashpay/platform/releases/download/v1.5.1/dashmate-v1.5.1-8f924cc0a-linux-x64.tar.gz &&tar xf dashmate-v1.5.1-8f924cc0a-linux-x64.tar.gz &&dashmate/bin/dashmate stop --platform &&dashmate/bin/dashmate update &&dashmate/bin/dashmate start --platform  &&dashmate/bin/dashmate status
 
Upgrading to Platform v1.6.1 for quick start guide users is as easy as this one liner.

Code:
rm -fr ~/dashmate ;wget https://github.com/dashpay/platform/releases/download/v1.6.1/dashmate-v1.6.1-1d4c3b418-linux-x64.tar.gz &&tar xf dashmate-v1.6.1-1d4c3b418-linux-x64.tar.gz &&dashmate/bin/dashmate stop --platform &&dashmate/bin/dashmate update &&dashmate/bin/dashmate start --platform  &&dashmate/bin/dashmate status
 
Upgrading to Platform v1.7.0 for quick start guide users is as easy as this one liner. Note it also upgrades to v22 of core.

Code:
rm -fr ~/dashmate ;wget https://github.com/dashpay/platform/releases/download/v1.7.0/dashmate-v1.7.0-b265bb81c-linux-x64.tar.gz &&tar xf dashmate-v1.7.0-b265bb81c-linux-x64.tar.gz &&dashmate/bin/dashmate stop --force &&dashmate/bin/dashmate update &&dashmate/bin/dashmate start &&dashmate/bin/dashmate status
 
Back
Top